


WebP It is a high-compression image format introduced by Google, typically reducing image file sizes by approximately 30% to 50% with minimal noticeable loss in image quality. For WordPress websites, smaller images mean faster page loading times and a lower bounce rate.
If you want to automatically convert uploaded JPG and PNG files to WebP, the most common approach is to install a plugin. This article compares three popular plugins: WebP Express, EWWW Image Optimizer, and LiteSpeed Cache, focusing on ease of use, compatibility, performance, and configuration complexity.
![Image[1] - EWWW Image Optimizer Setup Guide: How to Automatically Convert Images to WebP Format](https://www.361sale.com/wp-content/uploads/2026/01/20260107105241392-image.png)
I. WebP Express: Ideal for sites requiring manual control and flexible configuration
Pros:
- Customizable generation rules, such as converting only new images or images in specified directories.
- Supports local WebP conversion without relying on external APIs.
- right ApacheNginx provides configuration guides for rewrite rules.
Drawbacks:
- With numerous settings, beginners may easily feel overwhelmed.
- Some hosts may report errors when PHP GD/Imagick is not supported.
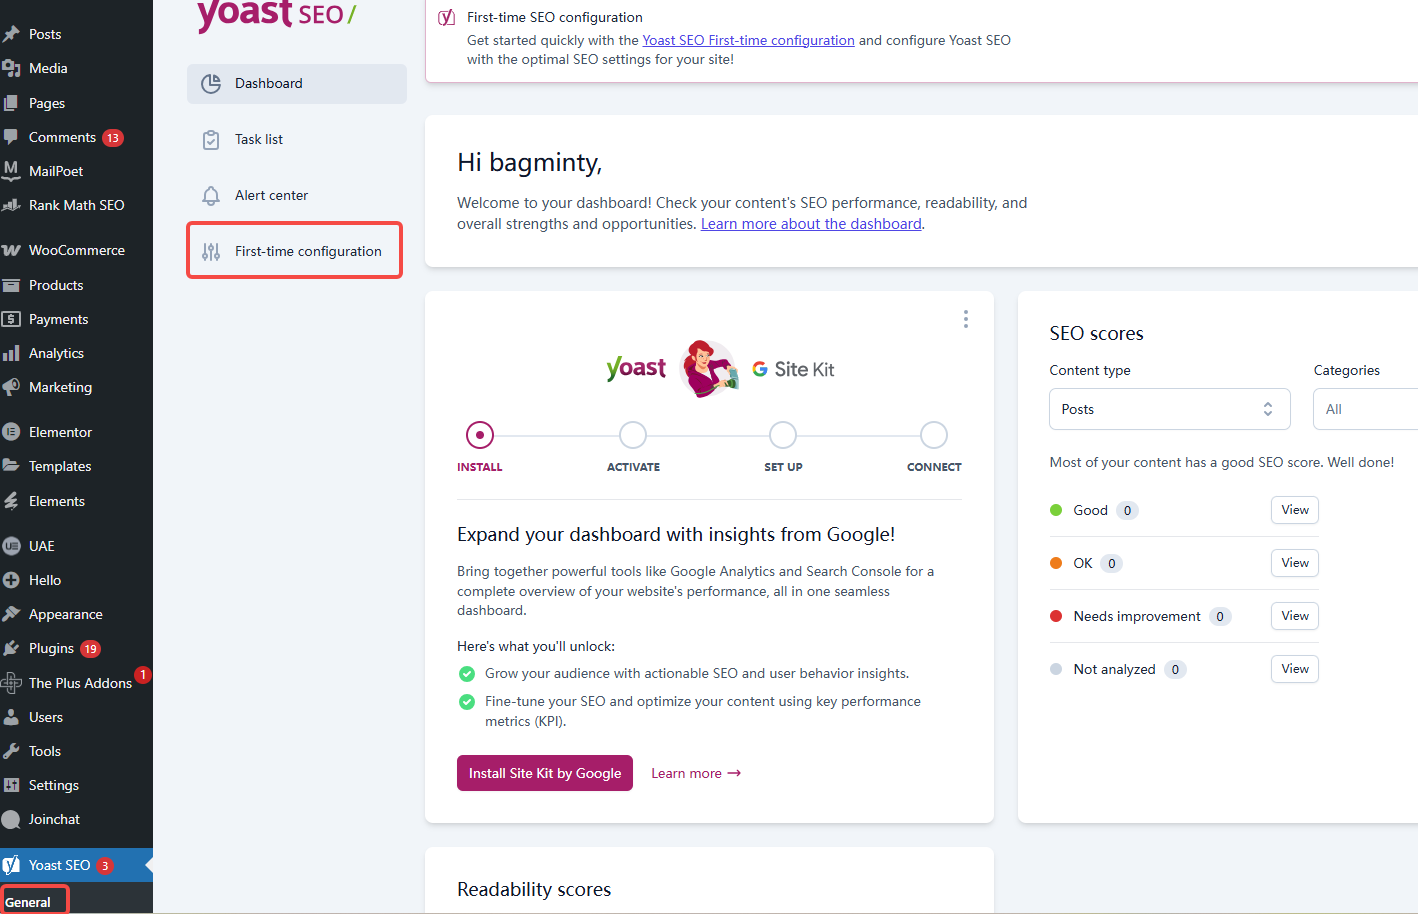
Installation and setup steps:
- go into WordPress Backend → Plugins → Install Plugins, search WebP Express and enabled.
![Image[2] - EWWW Image Optimizer Setup Guide: How to Automatically Convert Images to WebP Format](https://www.361sale.com/wp-content/uploads/2026/01/20260107101836313-image.png)
- Open the plugin settings and select "Convert on upload" (automatically convert during upload).
![Image [3] - EWWW Image Optimizer Setup Guide: How to Automatically Convert Images to WebP Format](https://www.361sale.com/wp-content/uploads/2026/01/20260107102011948-image.png)
- Select in "Conversion method" GD maybe ImagickThe
![Image [4] - EWWW Image Optimizer Setup Guide: How to Automatically Convert Images to WebP Format](https://www.361sale.com/wp-content/uploads/2026/01/20260107102106806-image.png)
- After saving, access several articles and check whether the image URL suffix has changed to
.webpThe - If images do not display during access, you must add the rewrite rules provided by the plugin to your host configuration file.
Good for the crowd:
Users who understand basic server configuration and wish to have complete control over conversion logic.
Two,EWWW Image OptimizerComprehensive capabilities, no complex configuration required
Pros:
- Enable automatic WebP generation and lazy loading with a single click.
- Supports batch compression of historical images.
- Offers both free and paid CDN optimization options.
Drawbacks:
- You must enable replacement rules in "WebP Delivery" to prevent the frontend from loading the old format.
- Some features require external network APIs (access from overseas servers is more stable).
Setup Steps:
- mounting EWWW Image Optimizer and enabled.
![Image [5] - EWWW Image Optimizer Setup Guide: How to Automatically Convert Images to WebP Format](https://www.361sale.com/wp-content/uploads/2026/01/20260107102944879-image.png)
- Go to "Settings → EWWW Image Optimizer" and enable "Enable WebP Conversion".
![Image [6] - EWWW Image Optimizer Setup Guide: How to Automatically Convert Images to WebP Format](https://www.361sale.com/wp-content/uploads/2026/01/20260107103228803-image.png)
- Check the "Force WebP" option to prioritize displaying WebP in the frontend.
![Image [7] - EWWW Image Optimizer Setup Guide: How to Automatically Convert Images to WebP Format](https://www.361sale.com/wp-content/uploads/2026/01/20260107103738443-image.png)
- After clearing the cache, refresh the page and check whether the image format is WebP.
Good for the crowd:
Ordinary users who want to quickly enable automatic WebP support without touching server configurations.
Three,LiteSpeed CacheThe best solution for host integration
Pros:
- If the host supports LiteSpeed, WebP conversion is extremely fast.
- Integrated management with page caching, lazy loading, and CDN.
- Automatically detects browser compatibility to ensure cross-browser support.
Drawbacks:
- Dependent on the LiteSpeed environment; certain features cannot be enabled on servers without this software.
- Conversion tasks require server privileges.
Setup Steps:
- Install and enable LiteSpeed Cache Plug-ins.
- Go to "LiteSpeed Cache → Image Optimization".
![Image [8] - EWWW Image Optimizer Setup Guide: How to Automatically Convert Images to WebP Format](https://www.361sale.com/wp-content/uploads/2026/01/20260107103956100-image.png)
- Click "Image Optimization" → "Submit Optimization Request," then wait for the task to complete.
![Image[9] - EWWW Image Optimizer Setup Guide: How to Automatically Convert Images to WebP Format](https://www.361sale.com/wp-content/uploads/2026/01/20260107104810504-image.png)
- Enable "WebP Replacement" under "Image Optimization → Image Optimization Settings".
![Image[10] - EWWW Image Optimizer Setup Guide: How to Automatically Convert Images to WebP Format](https://www.361sale.com/wp-content/uploads/2026/01/20260107104550100-image.png)
- Refresh the website to see if the image has been switched to
.webpThe
Good for the crowd:
Users of LiteSpeed hosting or OpenLiteSpeed environments.
IV. Comparison Summary of Three Plugins
| function point | WebP Express | EWWW Image Optimizer | LiteSpeed Cache |
|---|---|---|---|
| automatic conversion | Support conversion during upload | Supports uploading and batch conversion | Supports uploading and batch processing in the backend |
| No server setup required | clogged | be | Yes (LiteSpeed only) |
| Batch optimization of old images | manually operated | One-Click Batch | Automated Tasks |
| Lazy loading feature | not have | there are | there are |
| Browser Compatibility Handling | Manual Configuration | automatic detection | automatic detection |
| Learning cost | high | lower (one's head) | center |
| Recommended Scenarios | Highly customizable | General-purpose website | LiteSpeed Hosting Environment |
V. Recommended Choices and Optimization Suggestions
- Website hosted at LiteSpeed Hostingdirectly use LiteSpeed Cache Best results.
- For general-purpose servers, it is recommended to use EWWW Image OptimizerSimple to set up and stable.
- If you seek custom paths and high control, consider WebP ExpressThe
Additional recommendations:
- After enabling the plugin, test several pages to confirm that images still display properly in older browsers.
- Regularly clear the cache to ensure newly generated WebP files take effect immediately.
- utilization CDNConfigure WebP origin fetching rules synchronously to avoid redundant image compression.
concluding remarks
Automatically converting WordPress images to WebP has become a crucial step in accelerating website performance.
Selecting the appropriate plugin and configuring it properly can significantly reduce image file sizes without compromising quality.
For personal blogs or small-to-medium business websites, both EWWW and LiteSpeed Cache deliver quick results, while WebP Express offers greater flexibility for users with technical expertise.

Link to this article:https://www.361sale.com/en/85470The article is copyrighted and must be reproduced with attribution.


![Emoji[wozuimei]-Photonflux.com | Professional WordPress repair service, worldwide, rapid response](https://www.361sale.com/wp-content/themes/zibll/img/smilies/wozuimei.gif)
![Emoticon[baoquan] - Photon Wave Network | Professional WordPress Repair Services, Worldwide Coverage, Rapid Response](https://www.361sale.com/wp-content/themes/zibll/img/smilies/baoquan.gif)


No comments