


For the group of people who are in or aspire to enter the e-commerce industry, every business or individual aspires to have their own online mall. If you choose to useWordPress website builder(math.) genusWoocommerce It is one of the most powerful and popular e-commerce plugins. It can quickly transform your website into a fully functional online store.
This post will provide novice users withWoocommerce plugin activation detailed tutorials, including installation, activation, initial setup, and common problem solving. Even if you don't have a technical background, you can easily follow along.

I. What isWoocommerce plugin?
Woocommerce is a free e-commerce plugin developed by the Automattic team that supports theProduct management, order processing, payment method integration, logistics settingsand other features.
Benefits include:
- free and open source
- Multi-language and multi-currency support
- Extensible (with tons of extension plugins)
- Seamless integration with WordPress
Second, the preparatory work: open the mall before you need these
Before you start activating the Woocommerce plugin, make sure:
- Have built aWordPress website
- possessionadministrator rightsLog in to the backstage
- WordPress version is up to date (recommended)
- PHP version >= 7.4 (8.0+ recommended)
![Image [2]-Newbie must see: Woocommerce plugin activation and setup a complete tutorial, easy to create an online store](https://www.361sale.com/wp-content/uploads/2025/05/20250514151500116-image.png)
Third, the installation and activation of Woocommerce plug-ins [detailed graphic tutorials].
Step 1: Login to the WordPress backend
- Open your WordPress website backend address (usually the
yourdomain.com/wp-admin). - Enter the administrator account password to log in.
Step 2: Install the plugin
- Click [Plug-in] → [Install Plug-in] in the left menu.
- Enter it in the search bar in the upper right corner:
Woocommerce - Find the plug-in and click [Install Now
- Click [Activate Now] after installation is complete
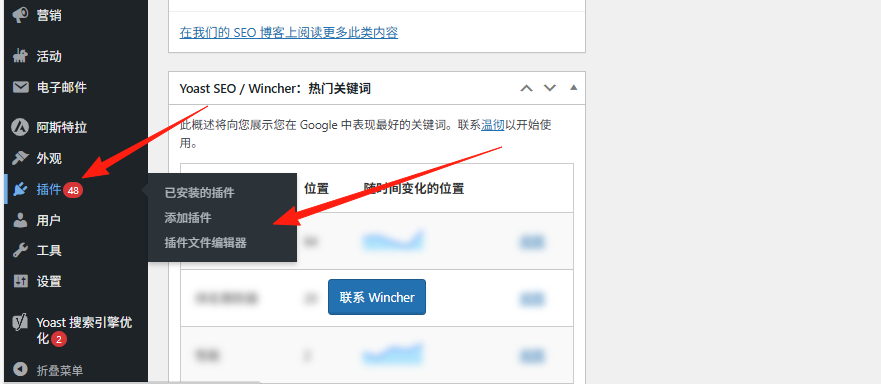
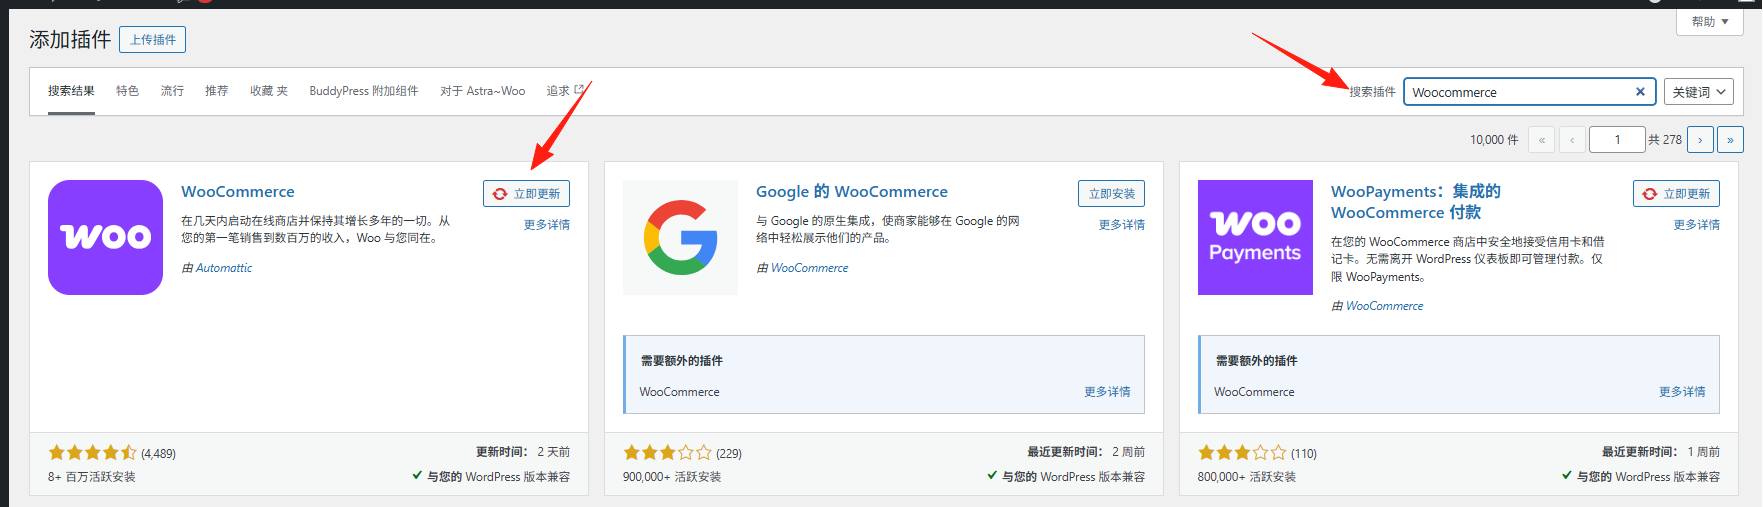
💡 Tip: The Woocommerce plugin logo is a purple shopping cart icon and the developer is Automattic.
IV. First-time activation of bootstrap settings (step-by-step opening of the store)
After activating the plugin, the system will automatically pop up theWoocommerce Startup Wizard. Follow the steps to set up:
Step 1: Fill in store information
- Country/Region, Address, City, Zip Code
- Whether the store is a brick-and-mortar or online mall
![Image [6]-Newbie must see: Woocommerce plugin activation and setup a complete tutorial, easy to create an online store](https://www.361sale.com/wp-content/uploads/2025/05/20250514151601242-image.png)
Step 2: Choose an industry
- Choose the industry in which you primarily sell (e.g.Clothing, electronics, foodetc.)
Step 3: Product Type
- Physical goods, digital goods or other types
- If you sellSubscription, Reservation Serviceand other functions, you can subsequently add extended plug-ins
Step 4: Fill in business information
- Options for annual sales estimates, current sales platforms, etc. (can be skipped)
Step 5: Recommended Plugin Installation (optional installation recommended)
- Jetpack, MailPoet, AutomateWooetc., can be checked as required
V. Setting up key functions
1. Adding payment methods
Go to [Woocommerce] → [Settings] → [Payment], you can enable the following methods:
- PayPal
- Stripe (credit card payments)
- bank transfer
- cash on delivery (COD)
![Image [8]-Newbie must see: Woocommerce plugin activation and setup a complete tutorial, easy to create an online store](https://www.361sale.com/wp-content/uploads/2025/05/20250514151833877-image.png)
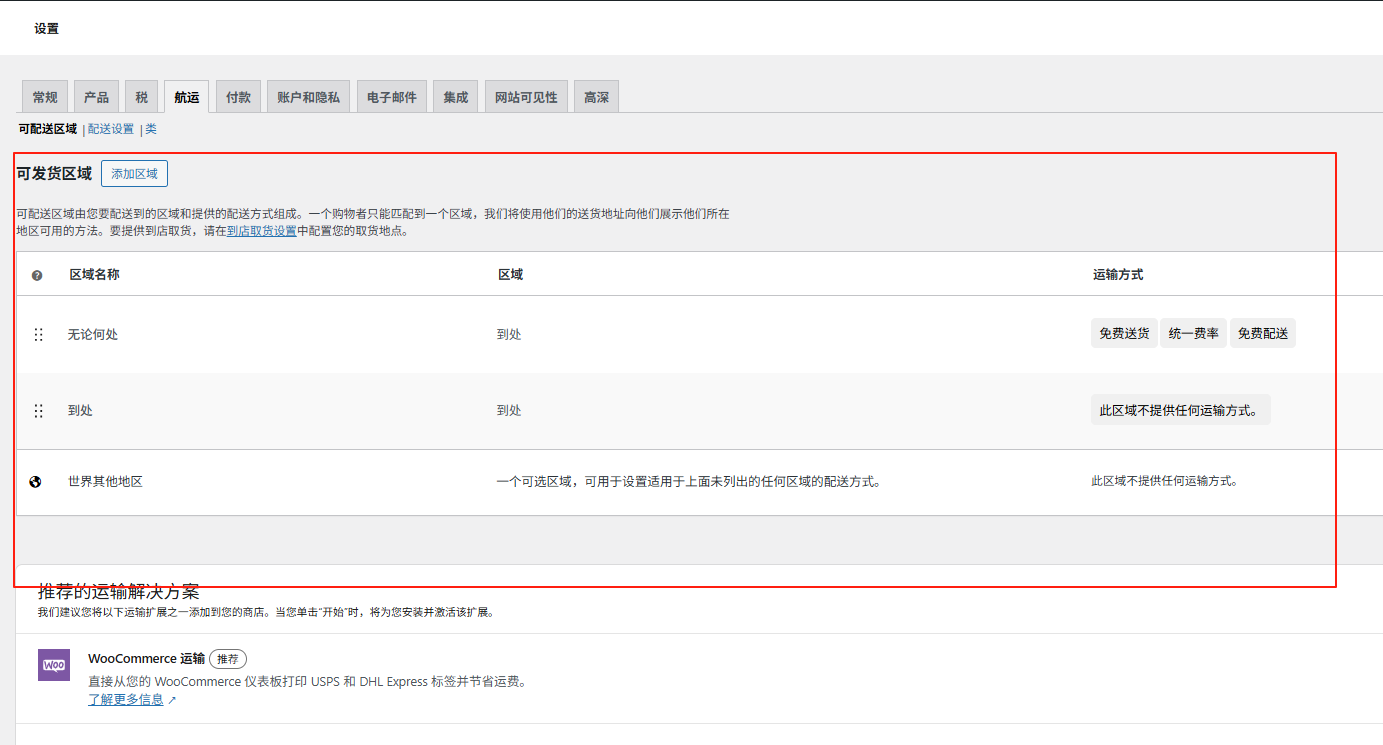
2. Setting logistics options
Configurable in [Settings] → [Distribution].Delivery area, shipping rules, express delivery methodetc.
3. Adding commodities
Click [Commodity] → [Add New Commodity], set the product name, description, price, picture, inventory, classification and other information.
![Image [10]-Newbie must see: Woocommerce plugin activation and setup a complete tutorial, easy to build an online store](https://www.361sale.com/wp-content/uploads/2025/05/20250514152028315-image.png)
VI. Common Problems and Solutions
| concern | rationale | method settle an issue |
|---|---|---|
| Error after plugin activation | PHP version too lowor plugin conflicts | Upgrade PHP or disable plugins one by one to troubleshoot conflicts |
| Not seeing the setup wizard | Plug-ins may have been set up in advance | Reset the wizard in "Woocommerce → Status → Tools". |
| Checkout page cannot be jumped | Page not generated correctly | Go to "Woocommerce → Status → Tools" and click on "Regenerate missing pages". |
VII. The next step: creating a professional mall experience
After activating and setting up Woocommerce, you can go further:
- Install a professional e-commerce theme (e.g. Astra, OceanWP, Flatsome)
- utilizationSEO plugin(e.g.Yoast SEO) Optimize product pages
- Integrated WeChat/Alipay/Stripe payment
- Add customer reviews, coupons, membership system and more!
concluding remarks
Woocommerce is a very cost-effective starting point for e-commerce newbies. With this detailed tutorial, I'm sure you've mastered theFrom installation and activation to basic setupThe whole process. The next step is to keep optimizing your product and user experience to really run an online mall.
If you encounter more technical problems in the process of use, welcome to leave a message to exchange, we will continue to update the relevant tutorials!

Link to this article:https://www.361sale.com/en/53987The article is copyrighted and must be reproduced with attribution.


![Emoji[wozuimei]-Photonflux.com | Professional WordPress repair service, worldwide, rapid response](https://www.361sale.com/wp-content/themes/zibll/img/smilies/wozuimei.gif)
![Emoticon[baoquan] - Photon Wave Network | Professional WordPress Repair Services, Worldwide Coverage, Rapid Response](https://www.361sale.com/wp-content/themes/zibll/img/smilies/baoquan.gif)


No comments